Meta Ads—formerly known as Facebook Ads—are one of the most powerful tools for digital marketers, startups, and brands looking to scale online. Whether you’re promoting a product, driving traffic to your website, or building brand awareness, Meta’s advertising ecosystem offers unmatched targeting, flexibility, and reach.
In this beginner-friendly guide, we’ll walk you through everything you need to know to set up your first Meta Ads campaign—from account creation to optimization.
📌 What Are Meta Ads?
Meta Ads refer to paid advertisements run across Meta’s platforms—primarily Facebook, Instagram, Messenger, and the Audience Network. These ads allow businesses to reach highly targeted audiences using demographic, behavioral, and interest-based data.
Whether you’re a startup, a D2C brand, or a freelancer, Meta Ads offer scalable solutions for brand awareness, lead generation, and sales.
Why Meta Ads?
- Over 3 billion monthly active users across platforms
- Advanced targeting options
- Multiple ad formats (image, video, carousel, reels)
- Real-time performance tracking
🛠️ Step 1: Set Up Your Meta Business Manager
Before launching any campaign, you need to create a Meta Business Manager account.
How to Set It Up:
- Visit business.facebook.com
- Create a new Business Manager account
- Add your Facebook Page and Instagram account
- Set up your payment method
- Assign roles to team members (Admin, Advertiser, Analyst)
Tip: Use two-factor authentication to secure your account.
🎯 Step 2: Define Your Campaign Objective
Meta Ads offer several objectives based on your marketing goals:
| Objective Category | Examples |
|---|---|
| Awareness | Brand Awareness, Reach |
| Consideration | Traffic, Engagement, Video Views, Lead Generation |
| Conversion | Sales, App Installs, Store Visits |
Pro Tip: For beginners, start with Traffic or Engagement to test your audience and creative.
🧠 Step 3: Understand the Campaign Structure
Meta Ads follow a three-tier structure:
- Campaign – Set your objective
- Ad Set – Define your audience, budget, and placements
- Ad – Choose your creative (image, video, carousel)
This modular setup allows you to test multiple audiences and creatives under one campaign.
👥 Step 4: Build Your Target Audience
Meta’s targeting options are powerful. You can choose:
- Core Audiences – Based on age, location, interests, behavior
- Custom Audiences – Retarget website visitors, app users, or email lists
- Lookalike Audiences – Reach new people similar to your existing customers
Example: Target women aged 25–45 in Mumbai interested in skincare and online shopping.
💸 Step 5: Set Your Budget and Schedule
You can choose between:
- Daily Budget – Spend a fixed amount per day
- Lifetime Budget – Spend a total amount over the campaign duration
Scheduling Options:
- Run ads continuously
- Set start and end dates
- Schedule ads for specific hours (e.g., evenings only)
Beginner Tip: Start with ₹500–₹1000/day to test performance.
📱 Step 6: Choose Your Placements
Meta offers automatic and manual placements:
- Automatic Placements – Recommended for beginners; Meta optimizes delivery
- Manual Placements – Choose where your ads appear (Facebook Feed, Instagram Stories, Messenger, etc.)
Best Practice: Use automatic placements initially, then refine based on performance.
🎨 Step 7: Design Your Ad Creative
Your ad creative includes:
- Format – Single image, video, carousel, slideshow
- Copy – Headline, primary text, call-to-action
- Media – High-quality visuals or videos
Tips for Beginners:
- Use Canva or Adobe Express for easy design
- Keep text minimal on images
- Include a clear CTA like “Shop Now” or “Learn More”
📊 Step 8: Launch and Monitor Your Campaign
Once your ad is ready, hit “Publish.” Meta will review it (usually within 24 hours).
Monitor Key Metrics:
- CTR (Click-Through Rate) – Measures engagement
- CPC (Cost Per Click) – Indicates cost efficiency
- Conversions – Track purchases, sign-ups, etc.
- Frequency – Avoid ad fatigue by refreshing creatives
Use Meta Ads Manager to view performance and make adjustments.
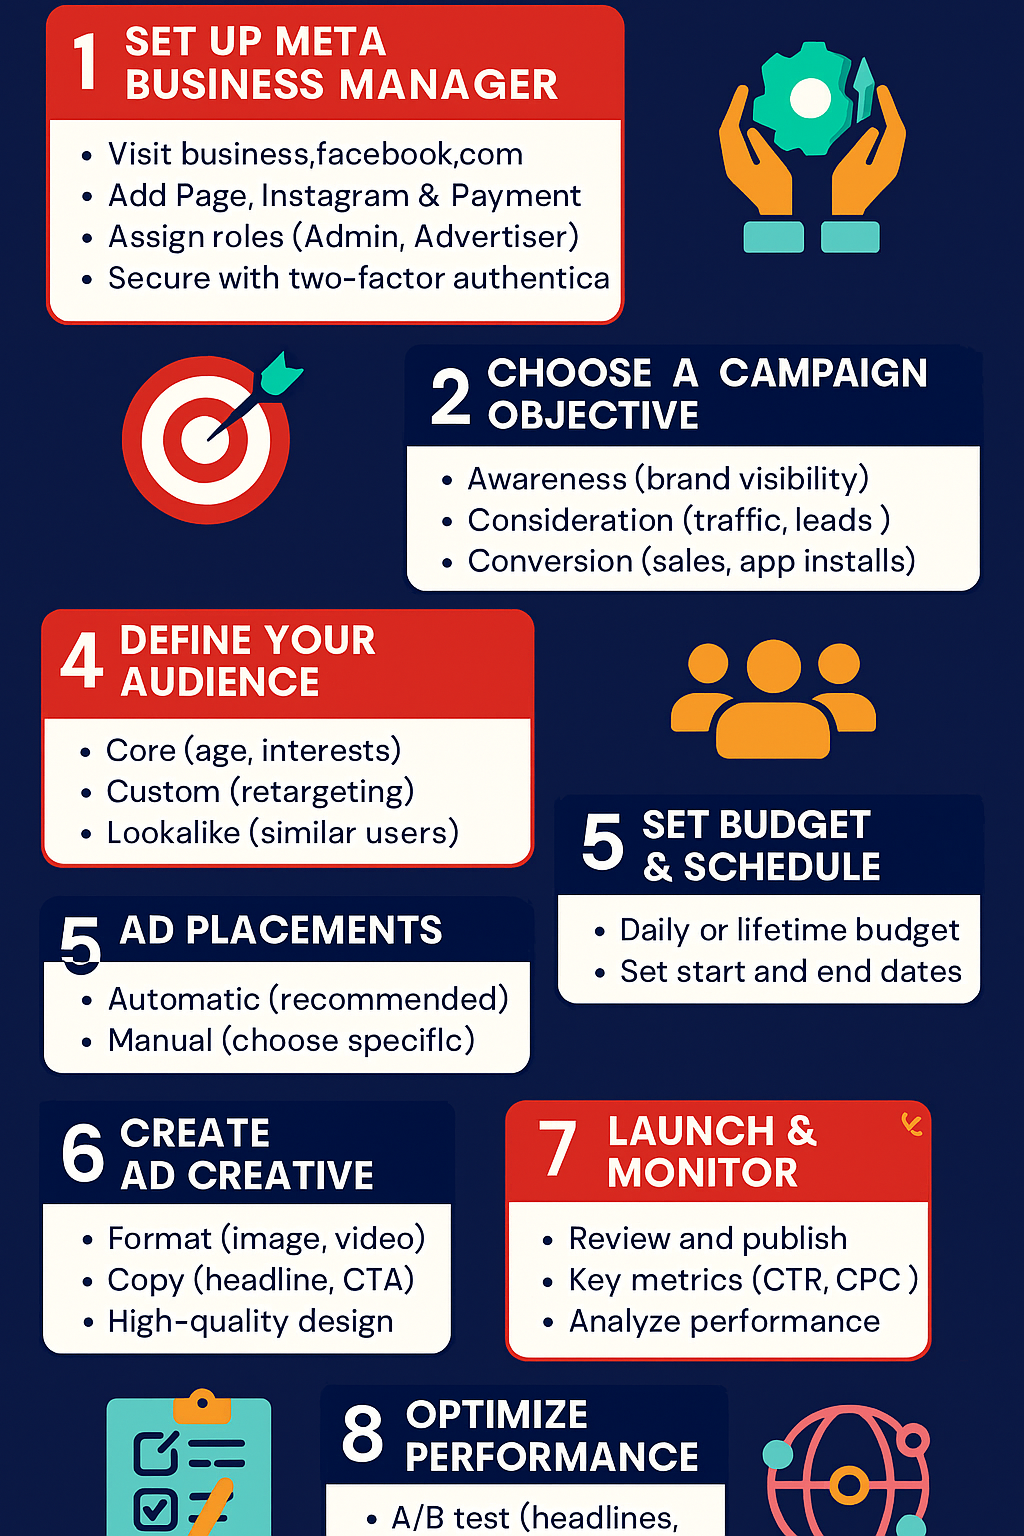
🔁 Step 9: Optimize Your Campaign
Optimization is ongoing. Here’s how to improve results:
- A/B Test – Try different headlines, images, or audiences
- Pause Underperforming Ads – Focus budget on winners
- Retarget Visitors – Use Custom Audiences to re-engage
- Refresh Creatives Weekly – Prevent ad fatigue
Advanced Tip: Use Meta’s Advantage+ Campaigns for automated optimization.
🧪 Bonus: Experiment with Meta Pixel
Meta Pixel is a code snippet you add to your website to track user behavior and conversions.
Benefits:
- Retarget visitors
- Track purchases, sign-ups, and page views
- Optimize for conversions
Install it via Meta Events Manager or use Google Tag Manager.
Download : Meta Ads Campaign Setup Guide Here
🧭 Final Thoughts
Meta Ads are one of the most powerful tools for digital marketers. With the right setup, targeting, and creative, even beginners can drive meaningful results. Start small, test often, and scale what works.
Ready to launch your first campaign? Bookmark this guide and dive into Meta Ads Manager today.